LIFE WITH LYNN


Sharing and enjoying my small-town life with my darling husband, family, friends,
faith, two adorable Ragdoll cats and one very sassy Yorkie!


Showing posts with label quilting. Show all posts

Saturday, April 23, 2011

Table-Topper Quilt; Step-by-Step


Looking for some fairly instant gratification (and to satisfy a bee that was buzzing around in my bonnet), I decided to make a "mini" quilt; actually a table-topper.  I had an idea in my head, so I figured out the style and finished size I would need and planned it out on graph paper:


First the squares of  fabric (100% cotton only, of course!) need to be cut, using a rotary cutter and clear quilting ruler.   Each square would have to be exactly 3" x 3" (for a finished block size of 2.5" x 2.5") and I knew that I'd need to cut 162 of the little buggers!  (28 "dark" value, 40 "medium", and 94 "light".)  So I went to my fabric stash and started rooting around.

Once  the fabrics were chosen and all the squares cut, I laid them out on the sewing table, arranging and rearranging until it was *juuuuust right*!  The general idea was darker squares through the center of the topper gradually fading out to medium and then light squares; with medium and dark colors at the outer edge as a "frame".

This type of quilt is called "on point", and that means that the squares are positioned on their points, diamond shaped.

Once I had all the blocks arranged (this is where my OCD kicks in big time!) and after my hubby gave it an objective second opinion (all squares pleasingly placed, color "even" throughout, no two colors accidentally placed side-by-side... etc!) -- I stacked, pinned and numbered the individual rows in preparation for sewing.  That's a bit time-consuming, but I've never been able to figure out an easier (but still idiot-proof!) way to successfully do that!


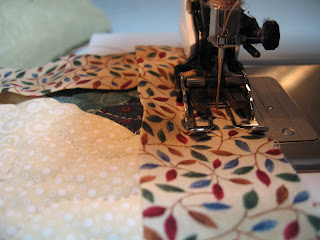
Now, using only 100% cotton thread, the fun (sewing!) started.  Each "packet" of pinned-together squares represents a specific row of the quilt.   I keep the rows carefully numbered, so I know the order to sew the rows together, when that time comes.  BTW, quilts are always sewn with one-quarter-inch seam allowance, and seams are always pressed to one side, never pressed open.


Now the individual rows are all done (sewn and pressed), and ready to be sewn together.  


Now the rows are sewn together.  It's not pressed yet, but it's starting to look like a quilt!


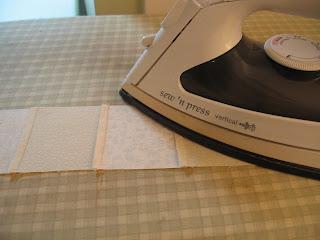
After I press the front, I carefully press the back.  (Yeah, I'm as OCD about the BACK as I am the front!)  But srsly  ;o)  careful pressing is as important as careful sewing, and if the seams aren't nice and flat and smooth, it WILL be noticeable when the quilt is finished!


Now the top is finished!  But the quilt is still far from being done.


Next I cut a piece of fabric for the back, and a piece of batting for the "middle" layer of the quilt, (I prefer "Warm and Natural", a thin 100% cotton batting).  Both the batting and the backing need to be cut a little larger than the quilt top.  Then I fold all 3 pieces lovingly, kiss them goodbye ;o)  and take the whole kit 'n' kaboodle to a professional machine quilter for her to do her magic.  Twenty five dollars and a few weeks later, this is what I get back:


Here are some close-ups of the stitching... isn't it beautiful?  This is called a "stipple" design, and it is my all-time favorite.  Nice and tight, with lots of thread.  *YUM!*


The quilt now needs "squared up" and the excess fabric and batting (carefully!) trimmed away.  A 15" clear, square Omni-Grid quilter's ruler works great for getting this right.


All 4 sides trimmed; quilt nice and "square":


The quilt is almost done.  It just needs the binding made and sewn along the edge to finish.

I chose the fabric for the binding and then figured out how much I needed to make:  (Basically, the outer perimeter of the quilt plus 10" added for the mitered corners, which in this case equals 138")   See how high-tech my cipherin' is?!


For 1/2"  finished binding, four strips of (40" wide) fabric are cut 3" wide, then sewn together into one long piece of fabric.  This is then folded in half lengthwise, pressed, and sewn with a 1/2" seam allowance to the front edge of the quilt (by machine), folded over and sewn to the back by hand.


The binding is now all sewn on.


Once the binding is pressed and folded to the back, and the corners neatly mitered, it's hand-sewn all around. A thimble and a good movie (and a kitty or two nearby!) makes this part pretty fast and enjoyable!

Here's what the finished back looks like:


*TA DA!*  Mission Accomplished!    Project Mini-Quilt complete and placed on the table!   I love it!


Really, how CUTE is that?!  And it was pretty darn quick 'n' easy, too -- especially with the help and company of my two quilt-lovin' trusty side-kicks!


*  For more quilt posts, please look here, here, and here!    Thank you!

Monday, September 20, 2010

Day # 20 (A Hobby of Mine)


A hobby of mine?  This was another HARD one.  I have LOTS of interests!  My problem is not lack of hobbies, my problem is lack of TIME to pursue them!

I love to do so many things!  Honestly, I simply do NOT understand "boredom".  How can anyone ever be bored in this wonderful world full of so many interesting and fun things to learn and do???!

OK... so before I get off on a tangent about that, back to the post at hand!
My main passion is probably quilt-making.  And if you click here, you can see my earlier blog post about my quilts. 

I love making quilts because:

(# 1) I love quilts.  I just DO.  I always have.  I love wrapping up in them, I love sleeping under them, I love the look and the feel of quilts and ...

(# 2) Quilting uses fabric and I am a fabric junkie.  I have what we quilter's affectionately refer to as "a stash".  A very big stash.  This means yards and yards of fabric, in a rainbow of colors and myriads of patterns... just waiting to be used.  I love looking at, touching, and buying beautiful fabric.   To me, quilting is like painting with fabric.

Here are a few quilts I have made that are not pictured in the other post:


This next quilt is one of my favorites... I made it for my nephew, Alex.  I told him there was love in every stitch, and there was!


I am working on a new one right now, for our queen size guest bed. 
Bentley likes sleeping on the pieces!


Yes, I'll  definitely have to de-furr it before I can sew it together... but that's OK!

OK, so time to move on to Hobby #2.  I also love (decorative) painting... and here are some things I have painted:


I like to paint fruit.   This is a wooden top to a neat tin-punch basket:


More fruit.  What you can't really see in the photo is the light metallic "shimmer" on the fruit.    That was a fun technique.


An old shoe shine kit, cleaned up and "fancified"!


I also LOVE folk art.  This was a fun project.   It's actually just a cardboard box; I painted and faux-finished the bottom of the box to look like aged leather.


Another fun project.  "Apple Orchard" on a wooden Bentwood box..


I'll paint on anything... even old crocks! 


 Painting little cottages is fun... and I went through a "birdhouse" phase!  ;o)


A couple of stools I painted:


The top:


 The top of the second stool:


This sign is pretty long, almost 3 feet.  


Another sign I made.  (My life's motto in 3 words!)


One of my favorite pieces... a sailboat with a painted canvas sail and flag.  I also faux-finished the bottom of the boat (it was just a plain block of wood.)


Crackled herbs and seeds sign, hanging in our guest bedroom:


Another favorite.  Looks like it's painted on old vintage wormwood, right?  Wrong!  Just a well-distressed and "antiqued" new piece of pine!  ;o)


A yellow rose.  I am actually pretty proud of the "water droplets" -- I think they look nicely realistic. 


Well, I could go on and on showing you stuff I have painted.... but I think you get the idea, right?!

I also like to make jewelry... fun, beaded costume jewelry.  I have a huge collection of beads in all shapes and sizes.  (I like to collect beads, too!)  Some earrings I have made: (I love dangly, french hook earrings... always have!)


My favorite bracelets to make are simple stretchy bracelets made with beads and silver accents.  I wear three of  these bracelets together A LOT.  Soooooo cute - and match almost everything!


I also like to "stamp" and scrapbook.  I have boxes of rubber stamps and inks and other supplies.  I make cards and memory books.  I can also use scraps of fabrics and beads in some of my projects.  As you can see, all of my hobbies have started overlapping!!!

Some cards (with matching envelopes) I have made:
Cards are fun, QUICK 'N' EASY projects!  And so much fun to send.
(The card at the very top of this post is another one I made.)


Here's a sampling of some scrapbooking I have done.
One for Boo... (Yes, my cat has a scrapbook.  Oh, quit laughing, it's not THAT funny!!!!)  ;o)


A few pages from it:


A vacation scrapbook I made from a cruise my husband and I were on a couple of years ago:


A few pages from it:
I like to cross-stitch, although I haven't done a project in years.  I've done some pretty cute ones, though.
Here's one that hangs in our downstairs guest bedroom:


I have also done stained glass, ceramics and pottery, VERY fun.  


I love home decorating, and scouring flea markets and garage sales for fun finds that I can repair, strip and refinish, or re-paint, or otherwise make functional and beautiful.

Here's a darling small dresser that I found at a flea market for $2.00.  A couple of coats of red paint, and some stenciled stars, then an all-over *distressing* , and voila' !


I like to cross-country ski.

I like to roller blade.  (Sorry, no pictures of that!!!)

I like to travel.  (Is that a "hobby"?)  (There will more info on that in a future post... so please stay tuned!)

I also like to read.  Mostly murder mysteries and whodunnits, but I'll read almost anything.

Sooo---  as you can see, there is NO shortage of things I love to do.  I just need more time to be able to them!